Session 5: Seeing SuperTuxKart Track with ROS2 and OpenCV
What We’ll Do
Get camera image from supertuxkart
Using the camera image and OpenCV, make the code see the road
Making the Code See the Road
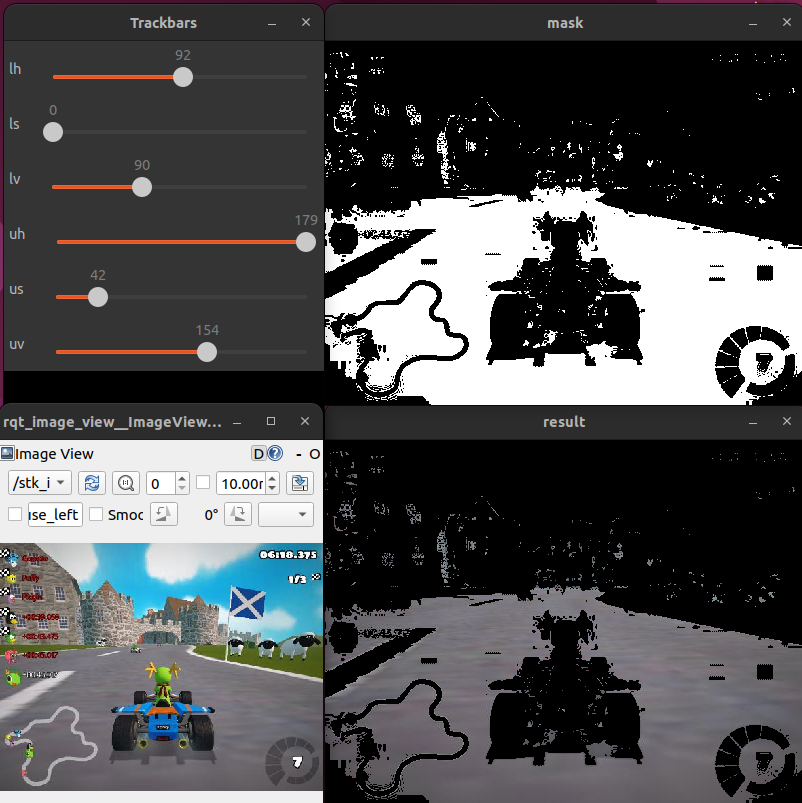
We’ll use something called an HSV filter from OpenCV library to help the code see the road in the game. Let’s see how it works.
In the next session, we find the largest contour in the mask and calculate its center. This helps us determine the direction in which the car should move.
Code Explanation
This code gets the game image and helps the code see the road.
HSV Value Detector with ROS2 and OpenCV
In this section, we will create a ROS2 node that processes images from a game, allowing us to detect specific colors using HSV sliders.
import rclpy
from rclpy.node import Node
from sensor_msgs.msg import Image
import cv2
from cv_bridge import CvBridge
import numpy as np

class HSVValueDetector(Node):
    def __init__(self):
        super().__init__("hsv_values_node")
        self.bridge = CvBridge()
        self.initial_flag = True
        self.subscription = self.create_subscription(
            Image,
            "/stk_image",  # Replace with your image topic
            self.hsv_calc,
            1
        )

    def nothing(self, x):
        pass

    def hsv_calc(self, msg):
        if self.initial_flag:
            self.initial_flag = False
            cv2.namedWindow("Trackbars")
            cv2.createTrackbar("lh", "Trackbars", 0, 179, self.nothing)
            cv2.createTrackbar("ls", "Trackbars", 0, 255, self.nothing)
            cv2.createTrackbar("lv", "Trackbars", 0, 255, self.nothing)
            cv2.createTrackbar("uh", "Trackbars", 179, 179, self.nothing)
            cv2.createTrackbar("us", "Trackbars", 255, 255, self.nothing)
            cv2.createTrackbar("uv", "Trackbars", 255, 255, self.nothing)

        frame = self.bridge.imgmsg_to_cv2(msg, "bgr8")
        hsv = cv2.cvtColor(frame, cv2.COLOR_BGR2HSV)

        lh = cv2.getTrackbarPos("lh", "Trackbars")
        ls = cv2.getTrackbarPos("ls", "Trackbars")
        lv = cv2.getTrackbarPos("lv", "Trackbars")
        uh = cv2.getTrackbarPos("uh", "Trackbars")
        us = cv2.getTrackbarPos("us", "Trackbars")
        uv = cv2.getTrackbarPos("uv", "Trackbars")

        l_color = np.array([lh, ls, lv])
        u_color = np.array([uh, us, uv])
        mask = cv2.inRange(hsv, l_color, u_color)
        result = cv2.bitwise_or(frame, frame, mask=mask)

        cv2.imshow("mask", mask)
        cv2.imshow("result", result)
        key = cv2.waitKey(1)
        if key == 27:
            cv2.destroyAllWindows()
            rclpy.shutdown()

def main():
    rclpy.init()
    hsv_detector = HSVValueDetector()
    rclpy.spin(hsv_detector)
    rclpy.shutdown()

if __name__ == "__main__":
    main()
Code Explanation:
Load Libraries
We start by importing the necessary libraries:
import rclpy
from rclpy.node import Node
from sensor_msgs.msg import Image
import cv2
from cv_bridge import CvBridge
import numpy as np
rclpy: ROS2 Python client library.
Node: Base class for creating ROS2 nodes.
Image: Message type for images.
cv2: OpenCV library for image processing.
CvBridge: Helper class to convert between ROS2 images and OpenCV images.
numpy: Library for handling arrays and matrices.
Initialize ROS2
We create a ROS2 node named
hsv_values_node:class HSVValueDetector(Node): def __init__(self): super().__init__("hsv_values_node")
Capture and Convert
We subscribe to an image topic (replace
"/stk_image"with your actual topic name) and convert the received images to HSV color space:self.subscription = self.create_subscription( Image, "/stk_image", self.hsv_calc, 1 )
The callback function,
hsv_calc, handles the image processing and slider setup:def hsv_calc(self, msg): if self.initial_flag: self.initial_flag = False cv2.namedWindow("Trackbars") cv2.createTrackbar("lh", "Trackbars", 0, 179, self.nothing) cv2.createTrackbar("ls", "Trackbars", 0, 255, self.nothing) cv2.createTrackbar("lv", "Trackbars", 0, 255, self.nothing) cv2.createTrackbar("uh", "Trackbars", 179, 179, self.nothing) cv2.createTrackbar("us", "Trackbars", 255, 255, self.nothing) cv2.createTrackbar("uv", "Trackbars", 255, 255, self.nothing) frame = self.bridge.imgmsg_to_cv2(msg, "bgr8") hsv = cv2.cvtColor(frame, cv2.COLOR_BGR2HSV)
Create Mask and Detect Color
The function reads the values from the sliders and creates a mask to detect specific colors:
lh = cv2.getTrackbarPos("lh", "Trackbars")
ls = cv2.getTrackbarPos("ls", "Trackbars")
lv = cv2.getTrackbarPos("lv", "Trackbars")
uh = cv2.getTrackbarPos("uh", "Trackbars")
us = cv2.getTrackbarPos("us", "Trackbars")
uv = cv2.getTrackbarPos("uv", "Trackbars")

l_color = np.array([lh, ls, lv])
u_color = np.array([uh, us, uv])
mask = cv2.inRange(hsv, l_color, u_color)
result = cv2.bitwise_or(frame, frame, mask=mask)
Display and Close
The mask and the result are displayed in OpenCV windows. The node keeps processing images until the escape key is pressed:
cv2.imshow("mask", mask)
cv2.imshow("result", result)
key = cv2.waitKey(1)
if key == 27:
    cv2.destroyAllWindows()
    rclpy.shutdown()
Running the Node
Finally, we initialize and run the node:
def main():
    rclpy.init()
    hsv_detector = HSVValueDetector()
    rclpy.spin(hsv_detector)
    rclpy.shutdown()
This keeps the node running and continuously processing incoming images.
Now you have a basic ROS2 node that uses sliders to adjust HSV values for detecting specific colors in an image.