Session 9: Preparing and Augmenting Training Images
Hello again, future AI drivers! 🚗✨ Welcome to another exciting step in your journey to building a self-driving car. Today, we’ll explore how to prepare and enhance training images to make them more effective for our model to learn from.
Think of this session as an art class for robots where we teach them how to “see” the world and focus on what’s most important! 🎨🤖
Note
We’ll continue using previous session’s Jupyter Notebook for this session. All the code snippets here are designed to run in that environment. Jupyter Notebook files have the extension .ipynb.
—
Step 1: Why Preprocess Images?
When teaching our car to drive, we start with images of the road. But raw images can be messy and full of distractions. Image preprocessing helps clean them up and simplifies what the car “sees.” It makes the training process faster and more efficient.
### What is Image Preprocessing? Image preprocessing involves making small changes to the image to highlight important details and remove unnecessary distractions. Here’s why it’s essential:
Focus on relevant features: Like road lanes, obstacles, and turns.
Remove noise: Ignore unnecessary details like trees, rocks, or cracks in the road.
Speed up training: Smaller and simpler images are easier for the car’s brain to process.
—
### Preprocessing Steps:
Convert Colors to YUV 🎨 - Road images are full of colors like green grass, blue sky, and gray asphalt. But not all these colors are useful. - Instead, we convert the image to the YUV format, which splits the image into brightness (Y) and color details (U and V). Brightness helps the car focus on lane markings and shadows.
Why YUV? Brightness (Y) highlights road edges and lane lines better than color. How? We use OpenCV’s cv2.cvtColor function to convert images.
Apply Gaussian Blur 🌀 - Raw images often include unnecessary details like cracks, shadows, or tiny pebbles. Gaussian Blur smooths out the image and removes these distractions. - It’s like squinting your eyes to see only the big picture, such as the road and lane boundaries.
Why blur? This makes the car focus on the overall structure of the road, ignoring tiny details. How? We use OpenCV’s cv2.GaussianBlur method.
Resize the Image 🏎️ - Large images take more time and memory to process. We resize them to a smaller, fixed size: 200 pixels wide by 66 pixels tall. - This is like shrinking a high-resolution photo to save space while keeping the important details.
Why resize? Smaller images make training faster without losing critical features. How? We use OpenCV’s cv2.resize function.
Normalize the Image 📏 - Each pixel in an image has a brightness value between 0 (black) and 255 (white). These large numbers are difficult for our car’s neural network to handle. - To simplify things, we normalize the image by dividing each pixel value by 255. This scales all values to a range between 0 and 1.
Why normalize? Smaller numbers are easier for the model to process and improve stability during training. How? Divide each pixel value by 255.
—
### Preprocessing Code
Here’s how we implement the steps:
import cv2
def img_preprocess(img):
img = cv2.cvtColor(img, cv2.COLOR_BGR2YUV) # Convert to YUV colors
img = cv2.GaussianBlur(img, (3, 3), 0) # Apply Gaussian Blur
img = cv2.resize(img, (200, 66)) # Resize to 200x66 pixels
img = img / 255.0 # Normalize pixel values
return img
# Example usage:
image = data["image_path"][100]
original_image = cv2.imread(image)
preprocessed_image = img_preprocess(original_image)
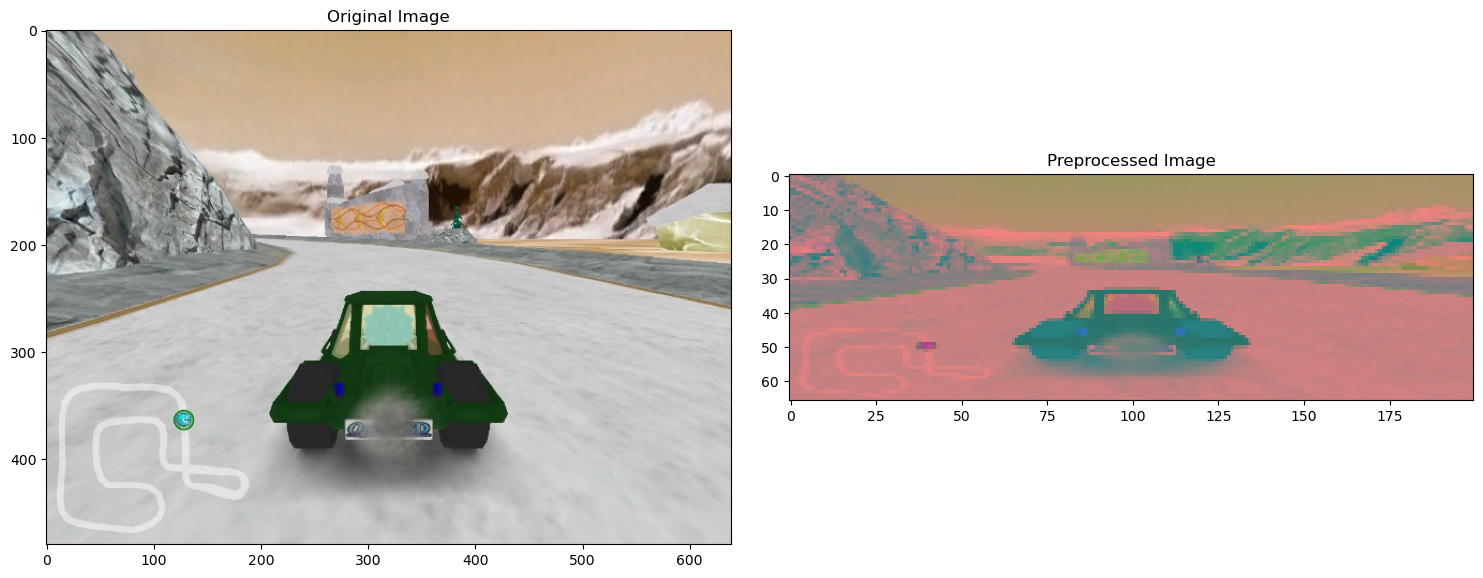
# Display original vs preprocessed images
fig, axs = plt.subplots(1, 2, figsize=(15, 10))
axs[0].imshow(original_image)
axs[0].set_title('Original Image')
axs[1].imshow(preprocessed_image)
axs[1].set_title('Preprocessed Image')
—
Step 2: Augmenting Images
Once images are preprocessed, we can augment them to make our dataset even better. Augmentation is like creating different variations of the same image to teach the car how to handle real-world situations.
### Why Augment Images? Imagine driving down a road on a sunny day. Now imagine the same road: - At night 🌙 - In fog 🌫️ - With the sun in your eyes ☀️
The road looks slightly different, but it’s still the same road. Augmentation helps the car learn to handle these variations. It’s like giving the car extra practice for real-world scenarios!
—
### Common Augmentation Techniques: 1. Zoom In/Out 🧐
Simulates the car being closer or farther from the object.
Pan (Shift Image) 🧭 - Moves the image slightly left, right, up, or down to mimic the car being off-center.
Adjust Brightness 💡 - Teaches the car to handle different lighting conditions.
Flip Image ↩️ - Flipping the image horizontally helps the car learn how to handle curves and turns.
—
### Augmentation Code
We use the imgaug library for augmentation. Install it using:
!pip3 install imgaug -q
Here’s how to apply augmentation:
from imgaug import augmenters as iaa

def zoom(image):
    zoom = iaa.Affine(scale=(1, 1.3))  # Zoom in or out
    return zoom.augment_image(image)

def pan(image):
    pan = iaa.Affine(translate_percent={"x": (-0.1, 0.1), "y": (-0.1, 0.1)})  # Pan the image
    return pan.augment_image(image)

def adjust_brightness(image):
    brightness = iaa.Multiply((0.2, 1.2))  # Change brightness
    return brightness.augment_image(image)

def flip_image(image, steering_angle):
    image = cv2.flip(image, 1)  # Flip image horizontally
    steering_angle = -steering_angle  # Reverse the steering angle
    return image, steering_angle

def random_augment(image, steering_angle):
    image = cv2.imread(image)
    if np.random.rand() < 0.5:
        image = pan(image)
    if np.random.rand() < 0.5:
        image = zoom(image)
    if np.random.rand() < 0.5:
        image = adjust_brightness(image)
    if np.random.rand() < 0.5:
        image, steering_angle = flip_image(image, steering_angle)
    return image, steering_angle
—
Step 3: Splitting the Dataset
We split our dataset into two parts:
Training Set: The car uses this data to learn.
Validation Set: We use this data to test how well the car learned.
### Why Split the Dataset? If we only train the car on one dataset, it might memorize it and fail on new data. Splitting ensures the car can generalize and perform well on unseen roads.
from sklearn.model_selection import train_test_split

X_train, X_valid, y_train, y_valid = train_test_split(
    balanced_data["image_path"], balanced_data["steer_angle"], test_size=0.2, random_state=6
)
—
Step 4: Creating a Batch Generator
We use a batch generator to feed small chunks of images to the car. This saves memory and speeds up training.
import random

def batch_generator(image_paths, steering_angles, batch_size, is_training, total_batches):
    num_batches = 0
    while num_batches < total_batches:
        batch_images = []
        batch_steering = []
        for _ in range(batch_size):
            random_index = random.randint(0, len(image_paths) - 1)
            img_path = image_paths.iloc[random_index]
            angle = steering_angles.iloc[random_index]

            if is_training:
                img, angle = random_augment(img_path, angle)
            else:
                img = cv2.imread(img_path)

            img = img_preprocess(img)

            batch_images.append(img)
            batch_steering.append(angle)

        yield (np.asarray(batch_images), np.asarray(batch_steering))
        num_batches += 1


x_train_gen, y_train_gen = next(batch_generator(X_train, y_train, 1, 1, 1))
x_valid_gen, y_valid_gen = next(batch_generator(X_valid, y_valid, 1, 0, 1))
View the training and validation images to see the differences:
fig, axs = plt.subplots(1, 2, figsize=(15, 10))
axs[0].imshow(x_train_gen[0])
axs[0].set_title('Training Image')
axs[1].imshow(x_valid_gen[0])
axs[1].set_title('Validation Image')

—
### Summary:
In this session, you learned:
How to preprocess images to simplify and clean them.
How to augment images to teach the car about real-world variations.
Why splitting the dataset is crucial for effective learning.
How to create a batch generator for efficient training.
Next time, we’ll use these images to train our self-driving car. 🚗💻 Let’s make the magic happen!